As an Amazon Associate, I earn from qualifying purchases
To change ink in an Epson printer, first, lift the scanner unit and open the cartridge cover. Then, gently push down on the old cartridge and remove it from the slot.
Now, let’s dive into a simple guide on how to change the ink in your Epson printer. Ensuring your printer maintains optimal performance is crucial for producing high-quality prints. One essential maintenance task that every printer owner should be familiar with is changing the ink cartridges.
By following a few straightforward steps, you can easily replace the ink in your Epson printer and continue printing efficiently. Let’s explore the process of replacing ink cartridges in an Epson printer to keep your printing tasks running smoothly.
Introduction To Ink Replacement In Epson Printers
Ink replacement in Epson printers is an important aspect of maintaining the quality and longevity of your printer. Whether you’re new to printer maintenance or looking for a refresher, this post will guide you through the process and help you keep your Epson printer running at its best.
The Importance Of Timely Ink Replacement
Regularly replacing ink cartridges in your Epson printer is crucial to maintain print quality and device functionality.
Signs That Your Epson Printer Needs New Ink
- Faded printouts or streaks on paper
- Low ink warning messages on the printer
- Blotches or smudges on printed pages

Identifying The Right Ink For Your Epson Model
When it comes to maintaining your Epson printer, ensuring that you use the right ink is crucial for achieving high-quality prints. Identifying the right ink for your Epson model is the first step towards ensuring optimal performance and longevity of your printer. In this guide, we’ll discuss the importance of choosing the correct ink for your Epson printer model and provide valuable insights into obtaining authentic ink cartridges.
Epson Ink Series: Compatibility Matters
Epson printers are designed to work seamlessly with specific ink series, and using the correct ink is essential for maintaining the printer’s performance and print quality. Each Epson printer model is compatible with a specific series of ink cartridges, which are formulated to deliver exceptional results.
Using an incompatible ink cartridge can lead to clogging of print heads, poor print quality, and potential damage to the printer. It’s crucial to identify the compatible ink series for your Epson printer model to ensure smooth functioning and optimal print results.
Where To Purchase Authentic Epson Ink Cartridges
To guarantee the performance and longevity of your Epson printer, it’s imperative to use authentic Epson ink cartridges. These cartridges are specifically designed to work with your printer model and are formulated to deliver vibrant, long-lasting prints.
Authentic Epson ink cartridges can be purchased from authorized retailers, online stores, or through the Epson official website. It’s important to ensure that you are purchasing genuine Epson ink cartridges to avoid potential issues and to maintain the warranty of your printer.
Preparation Steps Before Changing Ink Cartridges
Begin by powering off the Epson printer and allowing it to cool. Open the printer cover and access the ink cartridge compartment. Gently remove the old ink cartridge, dispose of it properly, then insert the new cartridge following the manufacturer’s instructions.
Preparation Steps Before Changing Ink Cartridges
If you own an Epson printer, you know how important it is to change ink cartridges regularly. However, before diving into the process, it is crucial to prepare yourself and your workspace. This will not only ensure a smooth and efficient process but also prevent any potential damage to your printer. In this post, we will guide you through the preparation steps before changing ink cartridges, including safety precautions and gathering the necessary tools and materials.
Safety First: Precautions To Take
When it comes to handling printers, safety should always be a top priority. Here are some precautions to take before changing ink cartridges:
– Turn off the printer and unplug it from the power source. This will prevent any electric shock or damage to the printer.
– Allow the printer to cool down before starting the process. This will prevent any burns or injuries caused by the hot printer components.
– Avoid touching the nozzles or electrical contacts of the ink cartridges. This can cause clogs or damage to the printer.
– Keep the ink cartridges out of reach of children and pets. Ink can be harmful if ingested or inhaled.
Gathering Necessary Tools And Materials
Before changing ink cartridges, it is essential to gather all the necessary tools and materials. Here’s what you’ll need:
- Replacement ink cartridges: Make sure you purchase the correct cartridges for your printer model.
- Gloves: Wear gloves to prevent any ink stains on your hands.
- Cleaning materials: You may need a clean cloth or cotton swabs to clean the printer components.
- Waste container: Keep a waste container nearby to dispose of used cartridges and cleaning materials.
- User manual: Keep the user manual handy in case you need to refer to it during the process.
By following these preparation steps, you can ensure a smooth and safe process for changing ink cartridges in your Epson printer. Remember to take your time and be careful while handling the printer components to avoid any damage.
Accessing The Ink Cartridge Compartment
To maintain print quality, it’s important to regularly change the ink cartridges in your Epson printer. Accessing the ink cartridge compartment is the first step in this process. Depending on the model of your Epson printer, the steps for accessing the ink cartridge compartment may vary. Below, we’ll cover the general process and also explore how to locate the cartridge bay in different models.
Powering Up And Opening The Printer
Before accessing the ink cartridge compartment, ensure that your Epson printer is turned on. Once powered up, gently open the printer’s top cover or front cover to reveal the cartridge bay. This step may differ slightly based on the specific model of your Epson printer.
Locating The Cartridge Bay In Different Models
Locating the cartridge bay in different Epson printer models involves identifying the specific location where the ink cartridges are housed. Here’s a general guide on how to locate the cartridge bay based on the type of Epson printer:
| Model Type | Cartridge Bay Location |
|---|---|
| Inkjet Printers | Cartridge bay is typically accessible after opening the top cover of the printer. |
| All-in-One Printers | Cartridge bay is often located behind a front panel that can be accessed by lifting or sliding it open. |
| Large Format Printers | Cartridge bay is usually located within the printer’s maintenance or ink cartridge compartment. |
Removing The Old Ink Cartridges
When it comes to maintaining your Epson printer, changing the ink cartridges is an essential task. Properly removing the old ink cartridges ensures the smooth and safe installation of new ones. Follow these techniques to safely eject used cartridges, and learn the best practices for handling and disposing of empty cartridges.
Techniques To Safely Eject Used Cartridges
To remove the old ink cartridges from your Epson printer, it’s crucial to follow the correct procedure. Start by ensuring that the printer is turned on, and then open the printer cover or cartridge access door. Wait for the printer to bring the cartridges to the center for easy access. Press the tab on each cartridge and carefully lift it out of its slot, avoiding contact with the ink nozzles. Once removed, place the old cartridges in a plastic bag to prevent any leakage.
Handling And Disposal Of Empty Cartridges
Handling and disposing of empty ink cartridges responsibly is important for environmental sustainability. After removing the old cartridges, store them in a cool, dry place if you plan to recycle them. Many office supply stores and recycling centers accept empty ink cartridges for recycling. If you choose to dispose of the cartridges, be sure to check local regulations for proper disposal methods. Avoid throwing them in the regular trash to minimize environmental impact.
Installing New Ink Cartridges
To change ink in an Epson printer, start by locating the cartridge access door. Open it carefully and wait for the cartridges to move to the center. Remove the old ink cartridges by pushing down on them, then insert the new ones until they click into place.
Installing new ink cartridges in your Epson printer is a simple process that you can easily do yourself. One of the most important steps is correctly inserting and seating the cartridges to ensure they are functioning properly. In this section, we will cover the steps for installing new ink cartridges, including unpacking and prepping the new cartridges, and correctly inserting and seating the cartridges.
Unpacking And Prepping The New Cartridges
Before you can install new cartridges, you must first unpack and prepare them for use. Follow these simple steps to get started:
- Remove the new cartridges from their packaging and remove any protective tape or plastic wrap.
- Shake each cartridge gently to distribute the ink evenly.
- Remove the yellow tape from the top of each cartridge, being careful not to touch the green chip on the side of the cartridge.
- Repeat these steps for all new cartridges that you will be installing.
Correct Insertion And Seating Of Cartridges
Once you have prepped the new cartridges, it’s time to insert them into your Epson printer. Follow these steps to ensure correct insertion and seating of the cartridges:
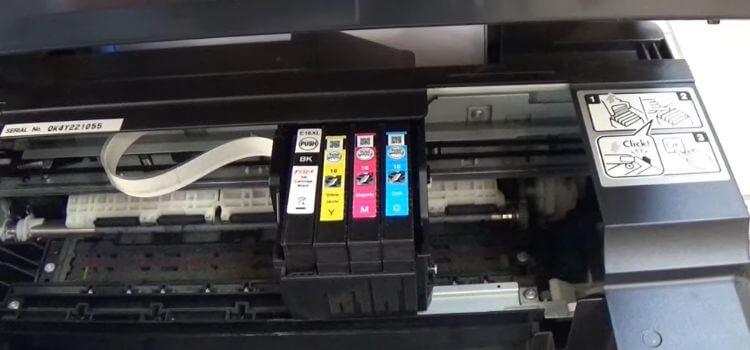
- Turn on your Epson printer and lift the scanner unit.
- Wait for the ink cartridge holder to move to the center of the printer.
- Press the tab on the cartridge you wish to replace and lift it out of the holder.
- Remove the new cartridge from its packaging and gently shake it.
- Remove the yellow tape from the top of the cartridge.
- Slide the new cartridge into the holder, making sure it clicks into place.
- Repeat these steps for all new cartridges that you will be installing.
- Close the scanner unit and wait for your Epson printer to charge the ink system.
By following these simple steps, you can install new ink cartridges in your Epson printer with ease. Remember to always use genuine Epson cartridges for best results, and to properly dispose of your used cartridges in an environmentally friendly manner.
Ensuring Successful Ink Cartridge Replacement
When it comes to maintaining the quality and efficiency of your Epson printer, ensuring successful ink cartridge replacement is essential. Running out of ink can disrupt your printing tasks, so knowing how to change the ink in your Epson printer can save you time and frustration.
Final Checks And Closure Of The Printer
Before replacing the ink cartridge, make sure the printer is turned off and unplugged. Open the printer cover carefully and wait for the cartridges to move to the replacement position. Gently remove the empty cartridge and dispose of it properly. Take the new ink cartridge out of its packaging and remove the yellow tape.
- Avoid touching the green chip on the cartridge and insert it into the correct slot.
- Close the printer cover and plug the printer back in.
Running A Test Print For Quality Assurance
Once the printer is powered on, run a test print to ensure the replacement was successful. Open a document on your computer and select “Print.” Check the quality of the printed document to ensure the ink is flowing smoothly and the colors are accurate.

Troubleshooting Common Ink Replacement Issues
When changing ink in your Epson printer, you may encounter some common issues that can be easily resolved. Below are solutions to address recognition errors and solve leakages and printing anomalies.
Addressing Recognition Errors
If your Epson printer does not recognize the new ink cartridge, try reseating it properly and ensuring it is compatible with your printer model.
Solving Leakages And Printing Anomalies
- Leakages: Check if the ink cartridge is properly installed and not damaged. Clean any spilled ink and replace the cartridge if needed.
- Printing Anomalies: Run a nozzle check and clean the printhead to resolve issues like streaks or missing colors.
Maintenance Tips For Long-lasting Printer Performance
For optimal printer performance, follow these maintenance tips to ensure long-lasting results. Changing ink in an Epson printer is a simple process that involves opening the cartridge cover, removing the old cartridge, and inserting the new one securely. Regularly replacing ink cartridges helps maintain print quality and prolongs the lifespan of your Epson printer.
Maintaining your Epson printer is crucial for ensuring long-lasting performance and high-quality prints. Here are some essential maintenance tips to help you keep your printer in optimal condition:
Regular Cleaning Routines
Regularly cleaning your Epson printer is vital for preventing clogs and ensuring consistent print quality. Use a soft, lint-free cloth to gently wipe the exterior of the printer, removing any dust or debris that may have accumulated. Additionally, perform regular printhead cleanings using the printer’s built-in maintenance functions to prevent clogging and maintain ink flow.
Optimizing Your Printer Settings For Ink Efficiency
Optimizing your printer settings can significantly impact ink efficiency and reduce overall printing costs. Adjust the print quality settings to a lower resolution when high-quality prints are not necessary, and consider using the “draft” mode for everyday printing tasks. Furthermore, enable the “Eco Mode” feature if available, which reduces ink consumption without compromising print quality.
By adhering to these maintenance tips and implementing ink-saving strategies, you can ensure that your Epson printer remains in optimal condition while maximizing ink efficiency.
Conclusion: Mastering Ink Replacement In Epson Printers
Mastering ink replacement in Epson printers is essential for seamless printing. Understanding the process of changing ink in an Epson printer ensures smooth operations and high-quality prints. By following the correct steps and using genuine ink cartridges, you can optimize the performance of your Epson printer.
Recapping The Key Steps
Recap the crucial steps to change ink cartridges in Epson printers:
- Turn on the printer and lift the scanner unit.
- Press the stop button until the print head moves to the cartridge change position.
- Squeeze the tab on the old cartridge and lift it out.
- Shake the new cartridge gently before unwrapping it.
- Insert the new cartridge into the holder until it clicks into place.
- Close the scanner unit and print a test page to check ink levels.
Benefits Of Proper Ink Management
Proper ink management in Epson printers yields various benefits:
- Enhanced print quality and clarity.
- Extended lifespan of the printer.
- Reduced chances of print head clogging.
- Cost-effective printing in the long run.
- Improved efficiency and productivity.
Frequently Asked Questions
To change ink in your Epson printer, open the ink cartridge cover, remove the old cartridge, and insert the new one securely. Close the cover and run a test print to ensure proper installation.
To change the ink on your printer, open the ink cartridge access door. Remove the old cartridge and insert the new one. Close the access door and follow the printer’s instructions to complete the ink replacement process.
To manually unlock Epson ink cartridges, first, open the printer cover and locate the cartridge. Then, gently push down on the cartridge and slide it out of the holder. Look for a small lever on the cartridge and push it back to release the lock.
Finally, reinsert the cartridge and close the printer cover.
To refill ink in an Epson printer, follow these steps:
1. Get an ink refill kit designed for Epson printers.
2. Turn on the printer and open the cartridge cover.
3. Remove the empty cartridge and fill it with the new ink.
4. Place the cartridge back in and close the cover.
To check if your Epson printer needs ink replacement, look for low ink warning messages on the printer screen or in the printer software on your computer.
Conclusion
Changing ink in your Epson printer is a simple process. By following these steps, you can ensure smooth printing operations. Remember to use genuine ink cartridges for optimal performance and longevity of your printer. Regular maintenance will keep your printer in top condition for efficient printing.
As an Amazon Associate, I earn from qualifying purchases
Leave a Reply